
In early 2018 I purchased my first Raspberry Pi, a Pi Zero. After seeing the platform’s potential, I eagerly purchased a 3B+ for some extra grunt in the hopes of replacing my home server. Low upfront cost and power efficiency are pretty appealing attributes when it comes to a device that’s running 24/7 in your home! Thankfully my compute demands aren’t extreme and so the humble Raspberry Pi fit the bill for many years.
Before the Pi, I ran everything on a HP Proliant Microserver (N36L). Back in the day, this was the value sweet spot. You got the form factor of a NAS with the price point of a fully loaded Pi!

Unfortunately for the microserver, mobile compute improved dramatically and it was dethroned by the Pi and other alternatives as the choice for homelabbers. A quick CPU head-to-head shows the current Pi 4B offers twice the compute of the humble N36L thanks to two extra cores. Despite a decade the difference it’s impressive to see how far tech has progressed and the new form factors we’ve unlocked as a result.

After many years and variants of a humble home server, I’ve managed to evade the infamous disk failure. Every year a backup solution sits on my list of things to do but never quite reaches the top. I’ve done a decent job of rotating SD cards on fresh installs and for the most part, it’s gotten me through unscathed however the risk of losing home assistant is an increasing worry as I become more dependent. The time has finally come to sit down and do the boring but responsible thing… backups.
What will it look like?
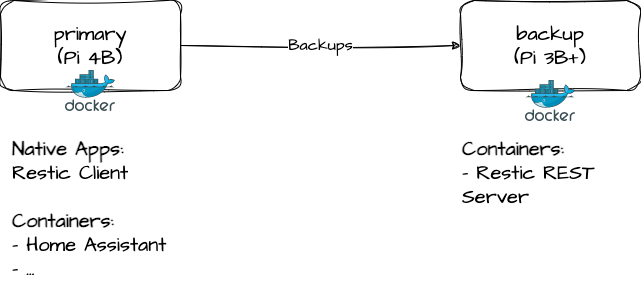
A Pi 4B currently hosts all my home services such as Home Assistant. These were previously running on a 3B+ which was subsequently resigned to the cupboard. Now is the time for its illustrious return into production!
Backup Selection
When it comes to backup solutions there are no shortage of options available on the market. I considered throwing back to my sysadmin days and taking advantage of the free tier of Veeam Backup but over the last year or so Restic was mentioned on the Self-Hosted podcast so I thought I’d give it a try.
Restic is an open source Go based backup client with support for various destinations such as SFTP, S3-compatible storage and it's own rest server to name a few. After exploring further there were a few things that sold me:
- Open source allows the code to be forked if the project goes subscription in the future.
- Client/Server architecture available.
- Server available as a container image.
- Server offers an ‘append only’ mode which should cover crypto-locker protection.
The Spike
Deploying restic was a surprisingly smooth process! Initially I planned to run the client against an SFTP endpoint but after discovering the rest server and its myriad of benefits the decision was a no brainer. The most significant advantage of the rest server being that it’s distributed as a container image. This is a big win because almost everything on my primary pi runs in a container. The increased predictability of standardised configuration between hosts and services means less mental gymnastics and time spent with maintenance.
To spike Restic I kicked off by running the server on my backup pi and the client on my primary pi. I ran both natively from the command line. This allowed me to get familiar with Restic and know what to expect from the product when the time came to deploy it properly.
- Server - Stand up the server:
./rest-server --path /store/backups/here --no-auth --append-only - Client - Initialise the repository:
restic -r rest:http://your-backup-server.local:8000/ init - Client - Run a backup to the repository:
restic -r rest:http://your-backup-server:8000/ --verbose backup /files-to-backup - Client - List the backups:
restic snapshots -r rest:http://your-backup-server:8000
Backups ran successfully and I could see them on the server however the server was throwing the warning WARNING: fsync is not supported by the data storage. This can lead to data loss, if the system crashes or the storage is unexpectedly disconnected.
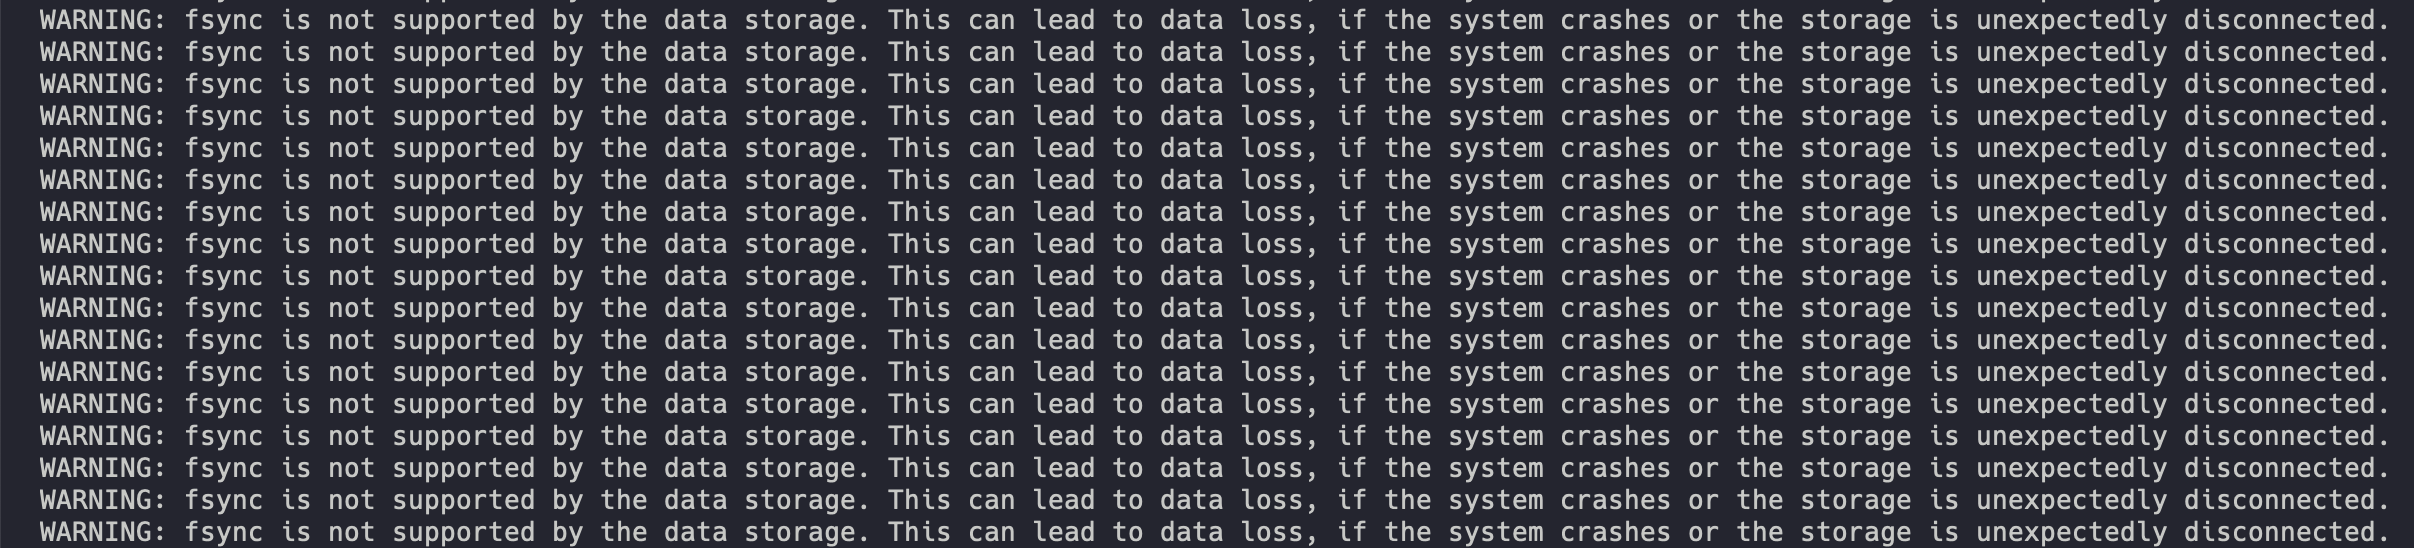
At first this was alarming, we want our backup system to be reliable after all! Digging deeper I discovered that Restic offers an integrity check. In the rare chance of a power outage mid backup, the integrity check can be run to provide certainty around that state of the backup. Satisfied with this solution I didn't bother investing additional time here.
The Deployment
When deciding how to deploy Restic I broke the solution down into two pieces, the client and the server. I chose to run the client natively on the primary Pi because (1) it’s not publishing a service for consumption and (2) backup software can benefit from the flexibility of running natively on a host. The rest server however made sense to run via docker since it’s hosting a service for the client.
Excited by the potential of standardisation on the server front, I was quickly brought back down to earth upon realising the container published isn’t available for ARM-based processors. Thankfully the project is open source! Leveraging the source code and Dockerfile contained within I created a repo on Github with an Action to build an ARM native image with docker and BuildKit. This runs on a weekly schedule, pulling in and publishing the latest changes from the original restic server repo. I should take a moment to highlight the awesomeness that is Go. I don’t need to do anything here! Go detects the architecture under which it’s being built (in this case ARM via the BuildKit emulator) and builds a native ARM binary which can run inside the native ARM container. The fact that it's so trivial to solve for architecture compatibility at both the container and application layers is awesome! Obviously the build process isn’t efficient due to the emulation layer but until Github hosted runners support native ARM instances this is a win!
Next up I needed to schedule the restic client to periodically run backups from the primary pi to the backup pi hosting the rest server. I was tempted to schedule this with a cron job but this was during #100DaysOfHomeLab, it’s about trying something new right? So I decided to register the backup services as a SystemD schedule instead. This was a little more involved but it allows the backup job to be called via SystemD like any other installed service. This is achieved by creating a your-thing.service file that defines the service (in this case the backup command) and a your-thing.timer file which defines the intervals at which it should automatically run. By default, SystemD associates the service with the timer based on the matching prefix your-thing.
One of the great things about scheduling with SystemD is the ability to test the backup in place by simply starting the service and checking /var/log/syslog for the log output. In contrast, cron feels a little clumsy for troubleshooting despite being easier to initially configure with a one-liner.
Overall I've been impressed with Restic. It's been running reliably for a few weeks now and I'm glad to know I won't need to resort to a rebuild if something goes wrong with Home Assistant. A cloud backup target is on the cards at some stage as a secondary location but for now I can rest easy knowing I'm covered for hardware failure. Last but not least, shoutout to the crew over at Self-Hosted for mentioning Restic, it's a great pod and worth a listen!